Agilent Users and Groups
Agilent features are only available to a set of users configured in WindowsAD platform and added to agilent specific group. An Admin creates Groups with specific permissions and then assigns users to these groups.
Agilent user types based on their roles:
| User | Description |
|---|---|
| Super Admin | User ( most privileged) configured while installing BI Hub. Super Admin is added to the "Admin" group and is the default user. |
| Admin | User added to "Admin" group by Super Admin and granted all the privileges like a Super admin. Except that Admins cannot modify "admin" group permissions, nor can add other Admins. Have both admin and user mode. |
| Power User | Special user added by an Admin. A Power user can perform all the assigned admin tasks, except they cannot modify the group permissions. A Power user has both admin and user mode. |
| User | This is a regular user with just a `user-mode. |
Before you begin#
Log-in to BI Hub as a Super Admin with username as bihubadmin, and password as password.
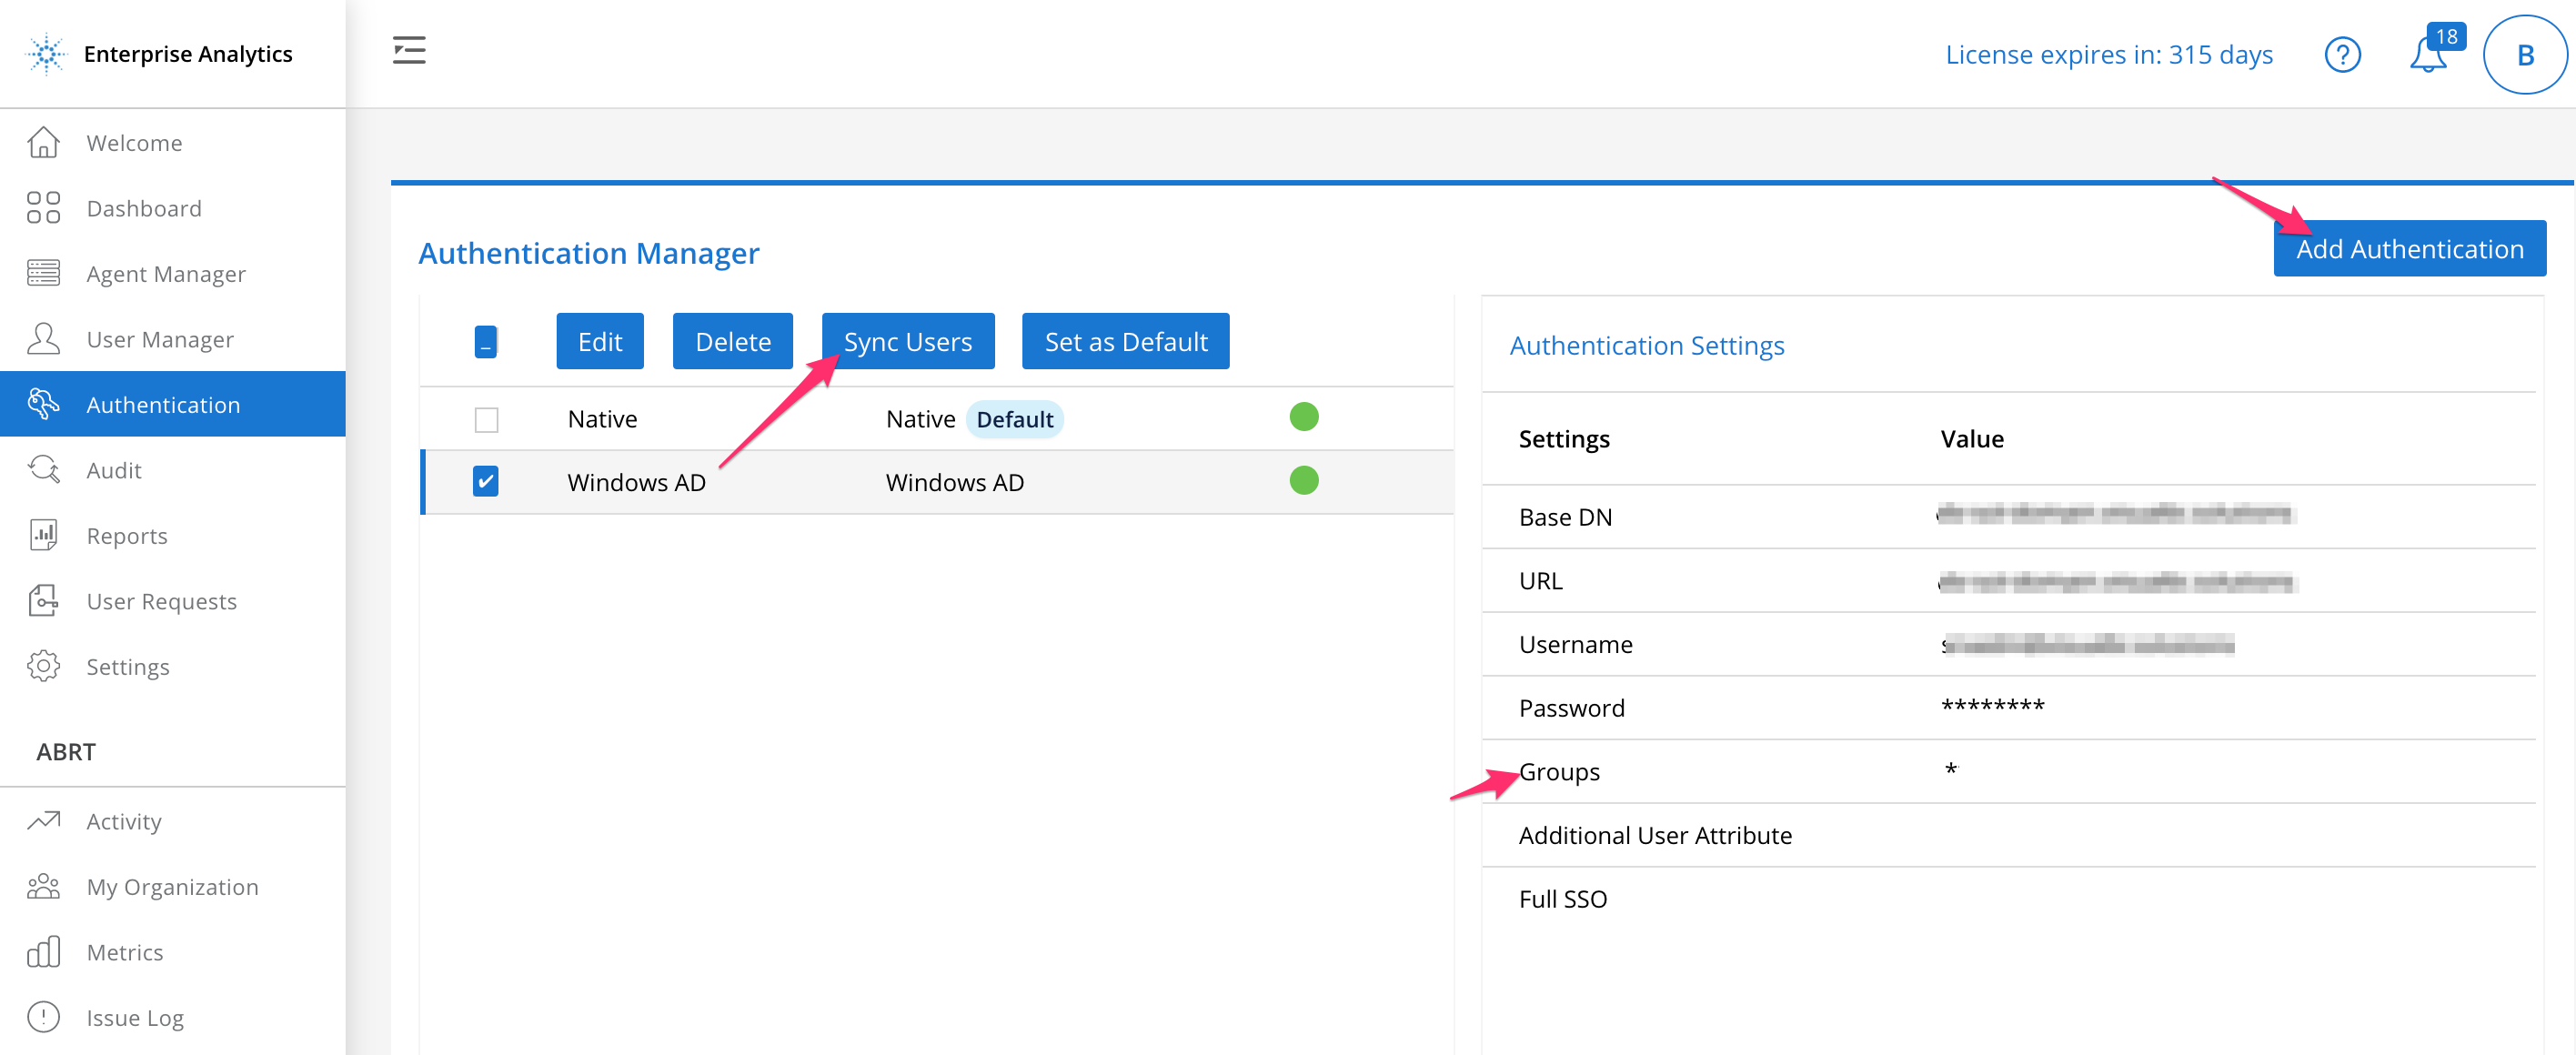
Go to Authentication page and select Add Authentication.
Add "Windows AD" authentication, and assign Groups.
WindowsAD Authentication
Add Agilent Users#
To add multiple agilent users from a group:
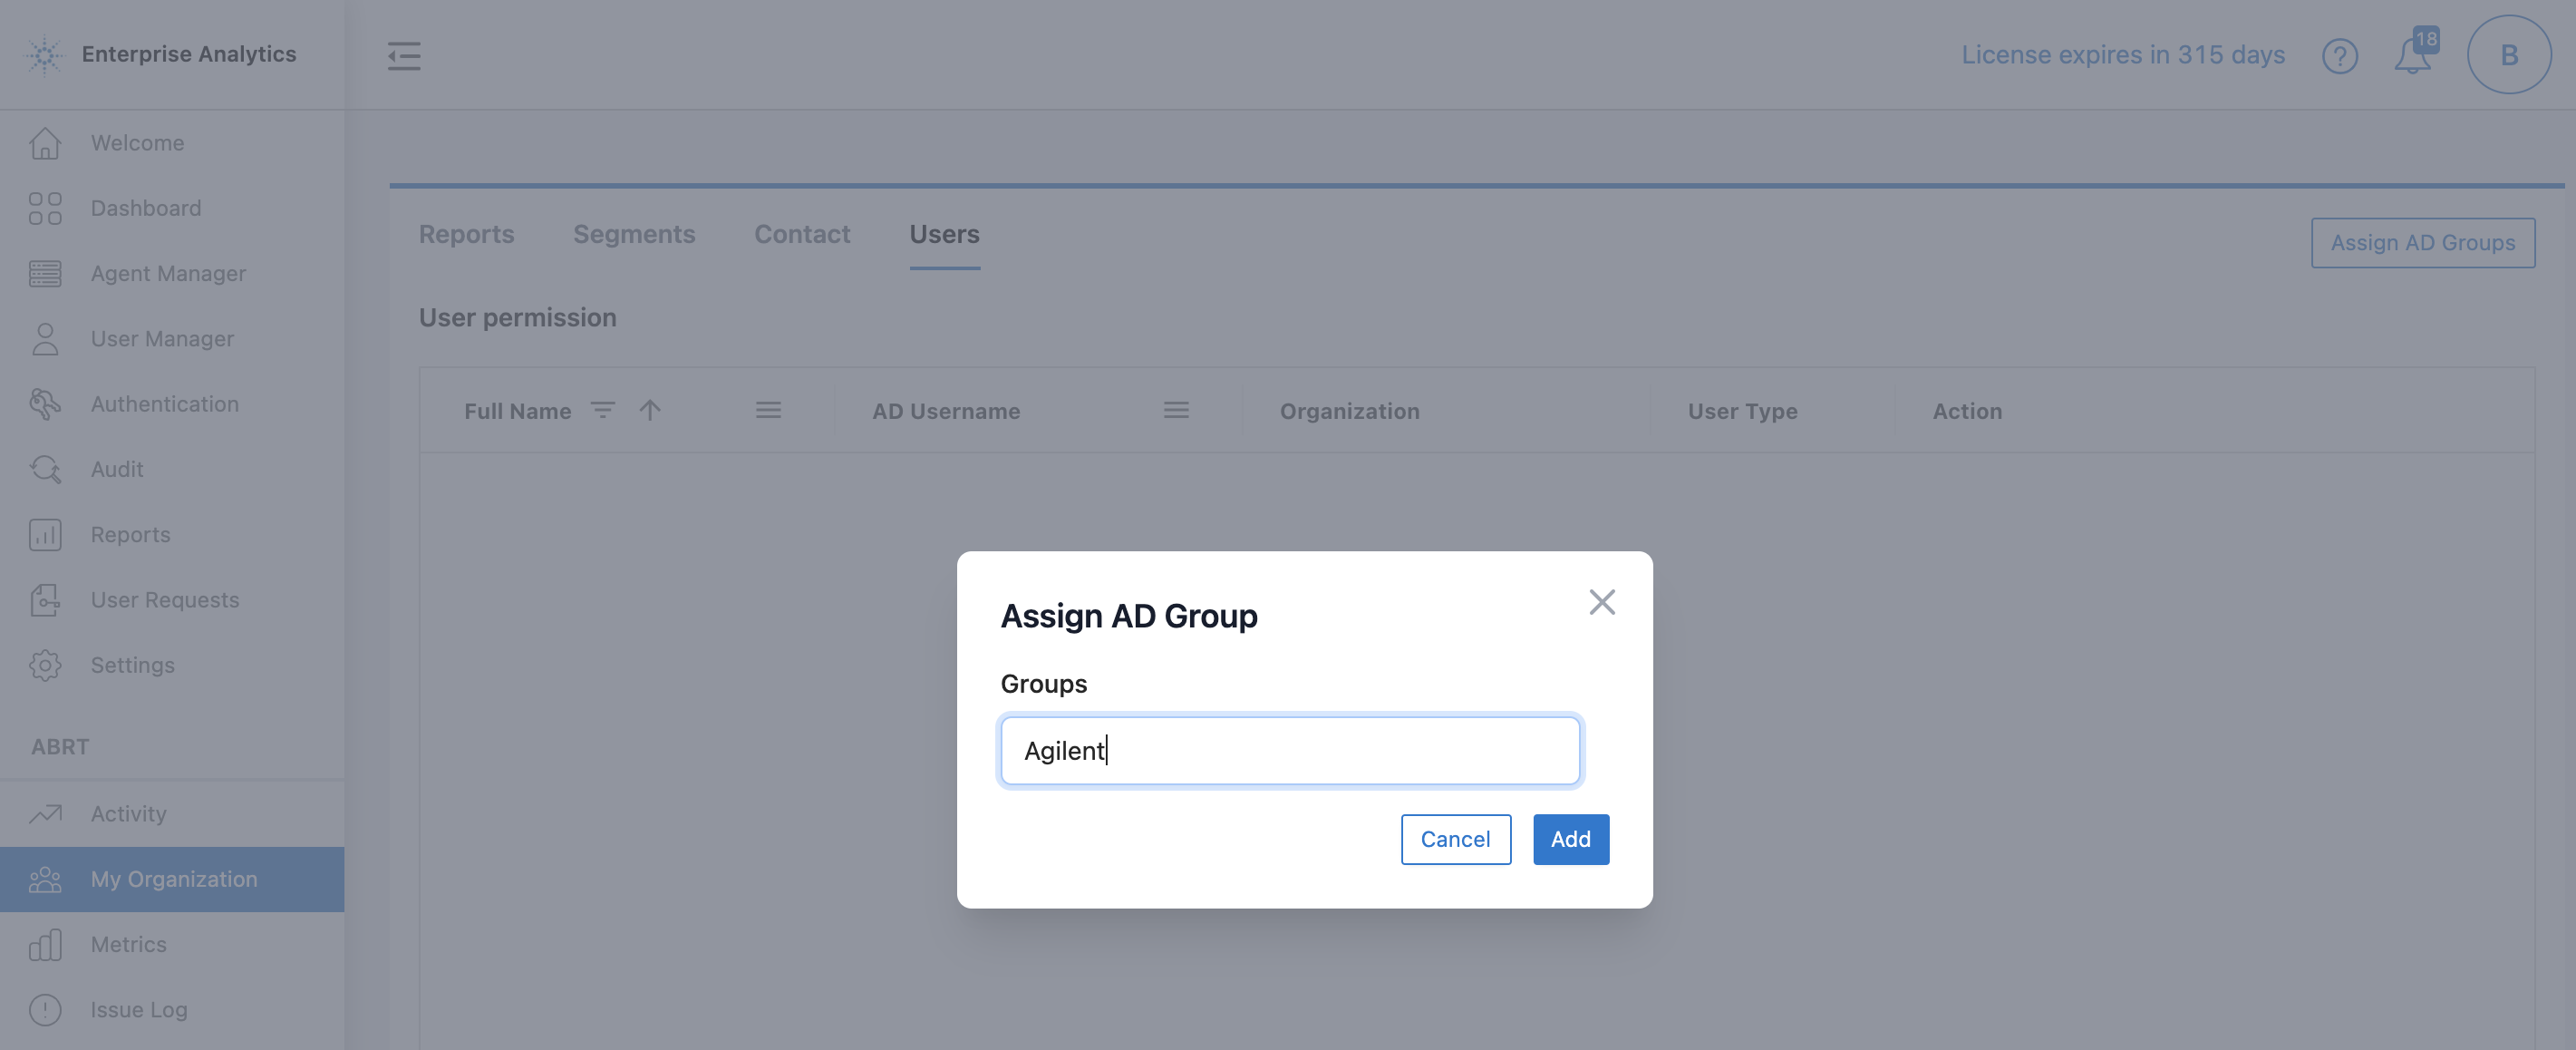
In My Organization > Users section, select Assign AD Groups and enter a single Windows AD Group or a list of Groups to pick the agilent users from. Select Add.
Assign WindowsAD Group
important
The Group(s) added here must already be added in the Authentication settings for Windows AD (as added in the previous section).
Select Authentication > Windows AD and click Sync Users.
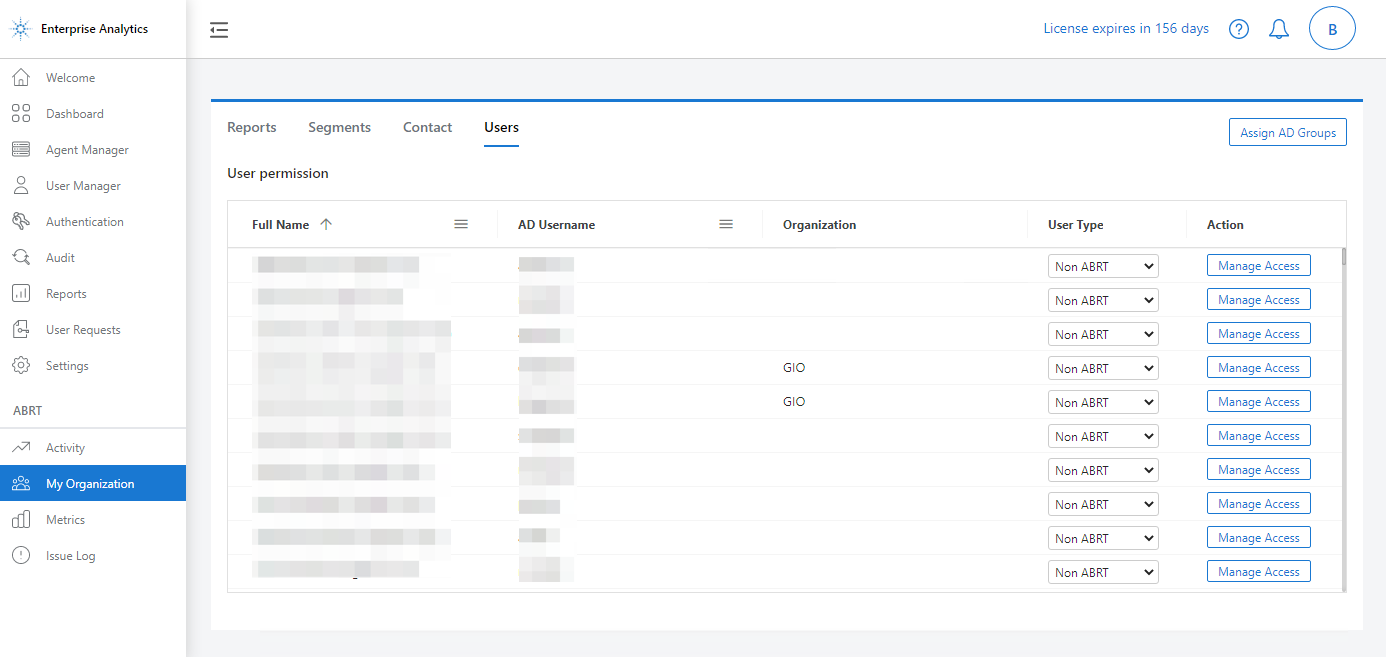
All the users from an assigned Group are added as Agilent users and listed in the My Organization > Users section.
Agilent Users
Create Admins#
Only a bihubadmin user can create other admins by adding Agilent users to the Admin group.
note
No other admin except bihubadmin is granted access to the Admin group and cannot create more super admins.
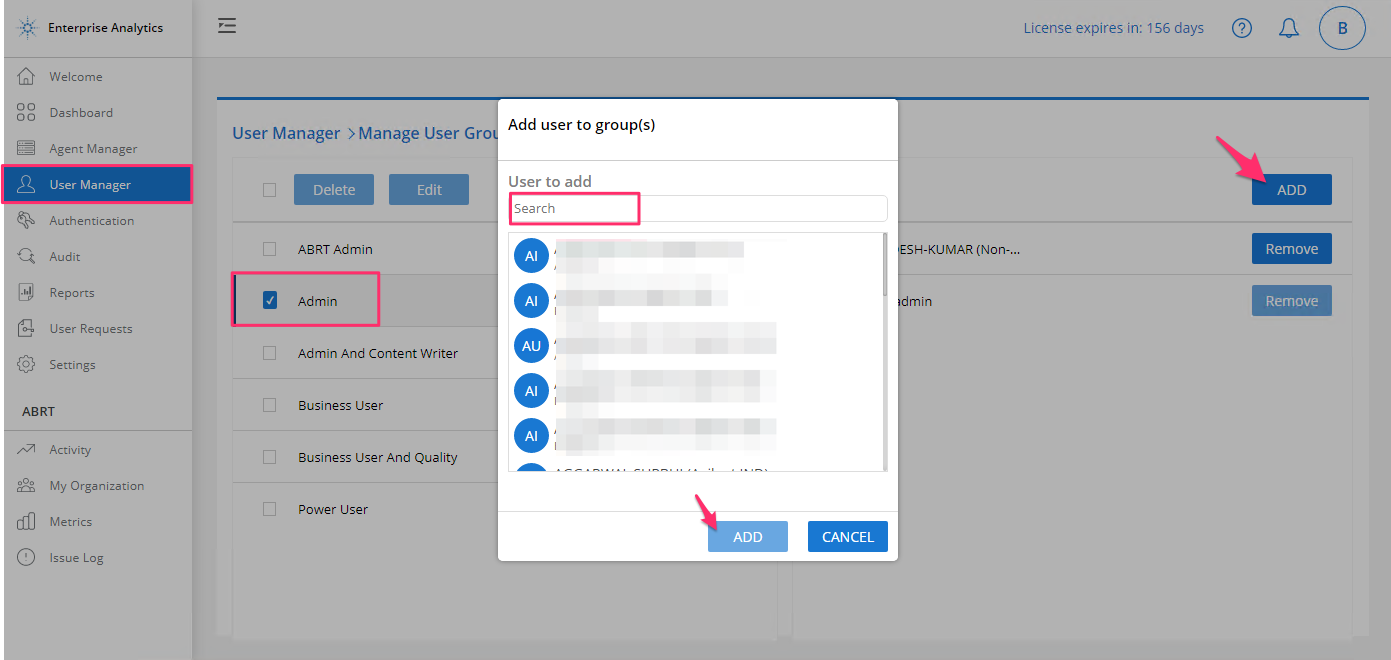
- Choose User Manager from the left hand navigation pane.
- Select Manage User Groups.
- Select the Admin group, and click ADD.
Add users as Admin
- In the Add user to group(s) pop-up, select a user(s) from the list and click ADD.
note
bihubadmin is not allowed to edit the permissions of the Admin group. Only a System Administrator must edit the Admin group permissions from the backend.
To remove a user from a group, select a group and click Remove next to a user.
Create Power Users#
Admins must also create one or more Power users. Admins must grant power users just a minimum set of permissions to administer the users/groups and ABRT reports.
A better approach is to create a customized user group with a limited subset of the admin privileges and then add the power users to this user group.
1. Create Agilent User Groups#
Log-in as an Admin and select Admin Mode at the top right corner.
Go to User Manager > Manage User Groups
Select Add User Group.
Enter a Group's name and select Create.
Select the group and click Manage Permissions next to the user group.
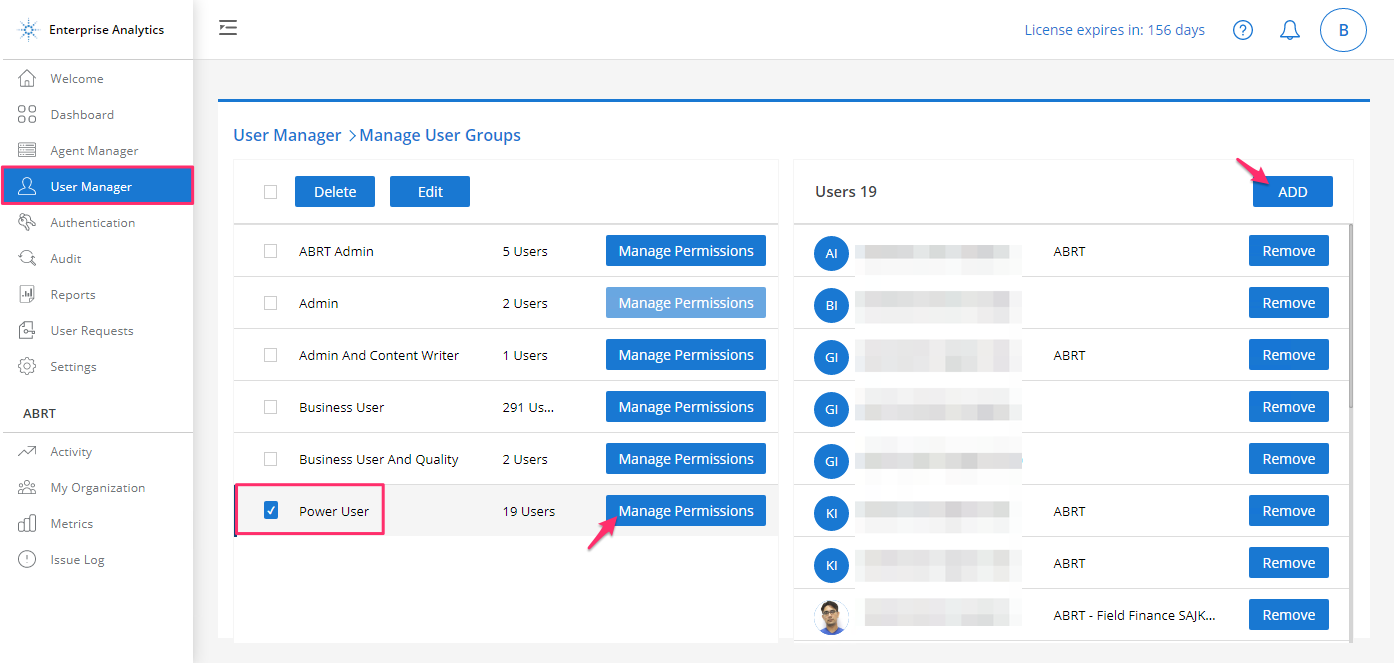
Create custom user group
Enable the desired Agilent permissions for a group.
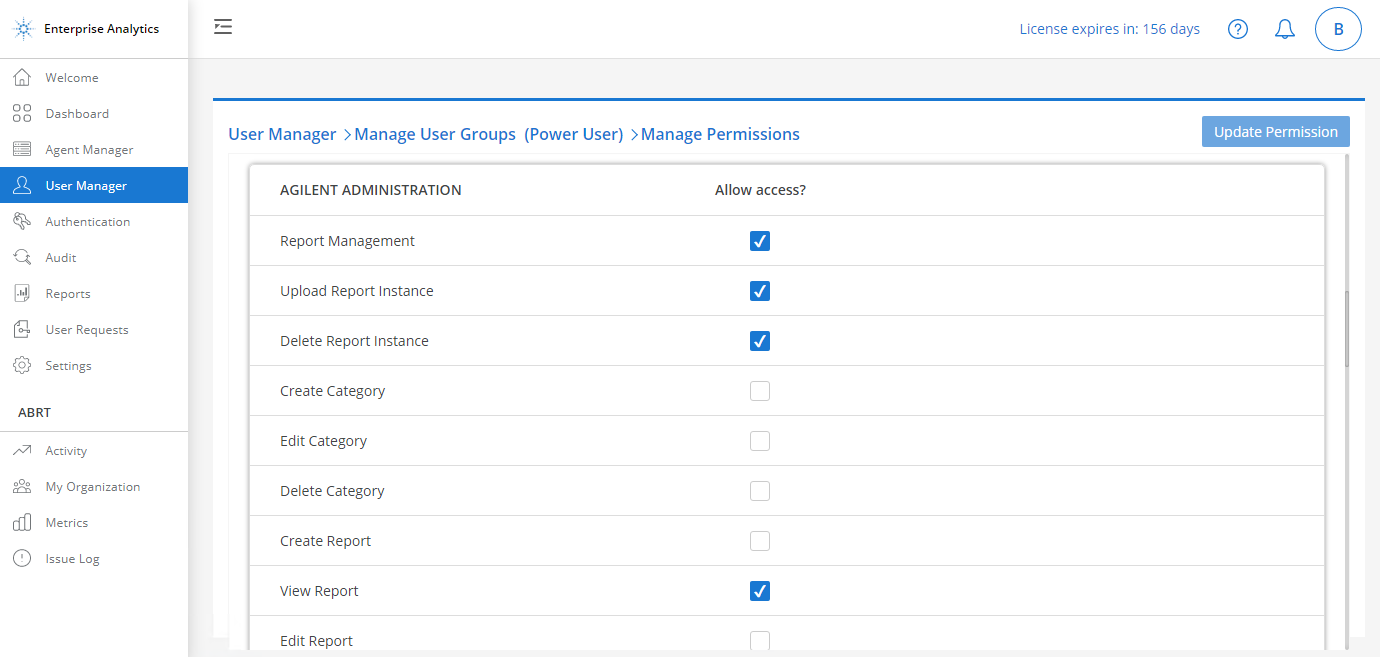
Agilent Permissions
Agilent Permissions#
To access the agilent features, you must allow access to the prerequisite permission.
If you disable the prerequisite permission*, all the dependent Agilent features will be grayed out.
| Agilent Permissions | Description | Prerequisite Permission* |
|---|---|---|
| Report Management | Manage Reports/Segments/Periods | n/a |
| Upload Report Instance | Upload Report(Web/Mobile) Instances | Report Management |
| Delete Report Instance | Select and delete the Report Instance | |
| Create Category | Create Categories to group similar reports | |
| Edit Category | Rename a Category | |
| Delete Category | Delete a Category and the reports added to it | |
| Create Report | Create Web and Mobile Reports | |
| View Report | View all the web/mobile Reports | |
| Edit Report | Edit Report's Name, Start Period and Frequency(Mobile) | |
| Delete Report | Delete a selected Report with the Period-Report-Segment combination | |
| Create Period | Add a new Period | |
| Freeze Period | Freeze the upload of reports for the selected Period(s) | |
| Edit Period | Edit the Period's name | |
| Delete Period | Remove a Period and the reports uploaded for that period | |
| Archive Period | Restrict both upload and download of reports for the Period | |
| Upload Datasheet | Document framework explaining what the report should contain. | |
| Send Report Review | Trigger an email to the reviewer with report's summary. | |
| Download Report | Download Report(s). | |
| Add Segment | Add Segment(s) to classify reports into sub-divisions | Segment Management |
| Edit Segment | Rename a Segment | |
| Delete Segment | Delete a Segment(s) | |
| Edit Segment Report Permission | Enable/disable Segment-level Report access | |
| Edit Support Management | Access to edit the Support Ticket Management values. | Support Management |
| Delete Support Management | Delete the Support Ticket Management data. | |
| Edit User Access | Enable/disable user's access on the Segments/Reports. | User Management |
| Manage AD Group | View the assigned AD Groups | |
| Edit AD Group | Edit (add/remove) AD Groups. | |
| Create User Group | Add a new User Group. | User Group |
| Edit User Group | Rename a User Group. | |
| Delete User Group | Delete a User Group. | |
| Manage User Group | Add/remove users from a Group. | |
| View Activity | View the Activity logs. | N/A |
| View Subscription | View the Mobile Subscriptions | View Activity |
| View Issue Log | View the Issue logs raised by the users. | N/A |
| Edit Issue Log | Edit Issue Log Status and Comments. | View Issue Log |
| Manage Report Review | Get and edit review. | N/A |
| Send Report Notification | Get details and send web report notification | N/A |
| Manage Subscription | View Mobile Subscriptions. | N/A |
| Send Mobile Notification | Send Mobile Notification icon enabled. | N/A |
| Edit Welcome Page | Edit the Agilent Welcome message. | N/A |
| View Metrics | View the usage metrics of the platform based on various parameters. | N/A |
2. Add User ( Power Users ) to User Group#
- Select the User Group, and click ADD.
- In the Add user to group(s) pop-up window, search the username(s) and select ADD.
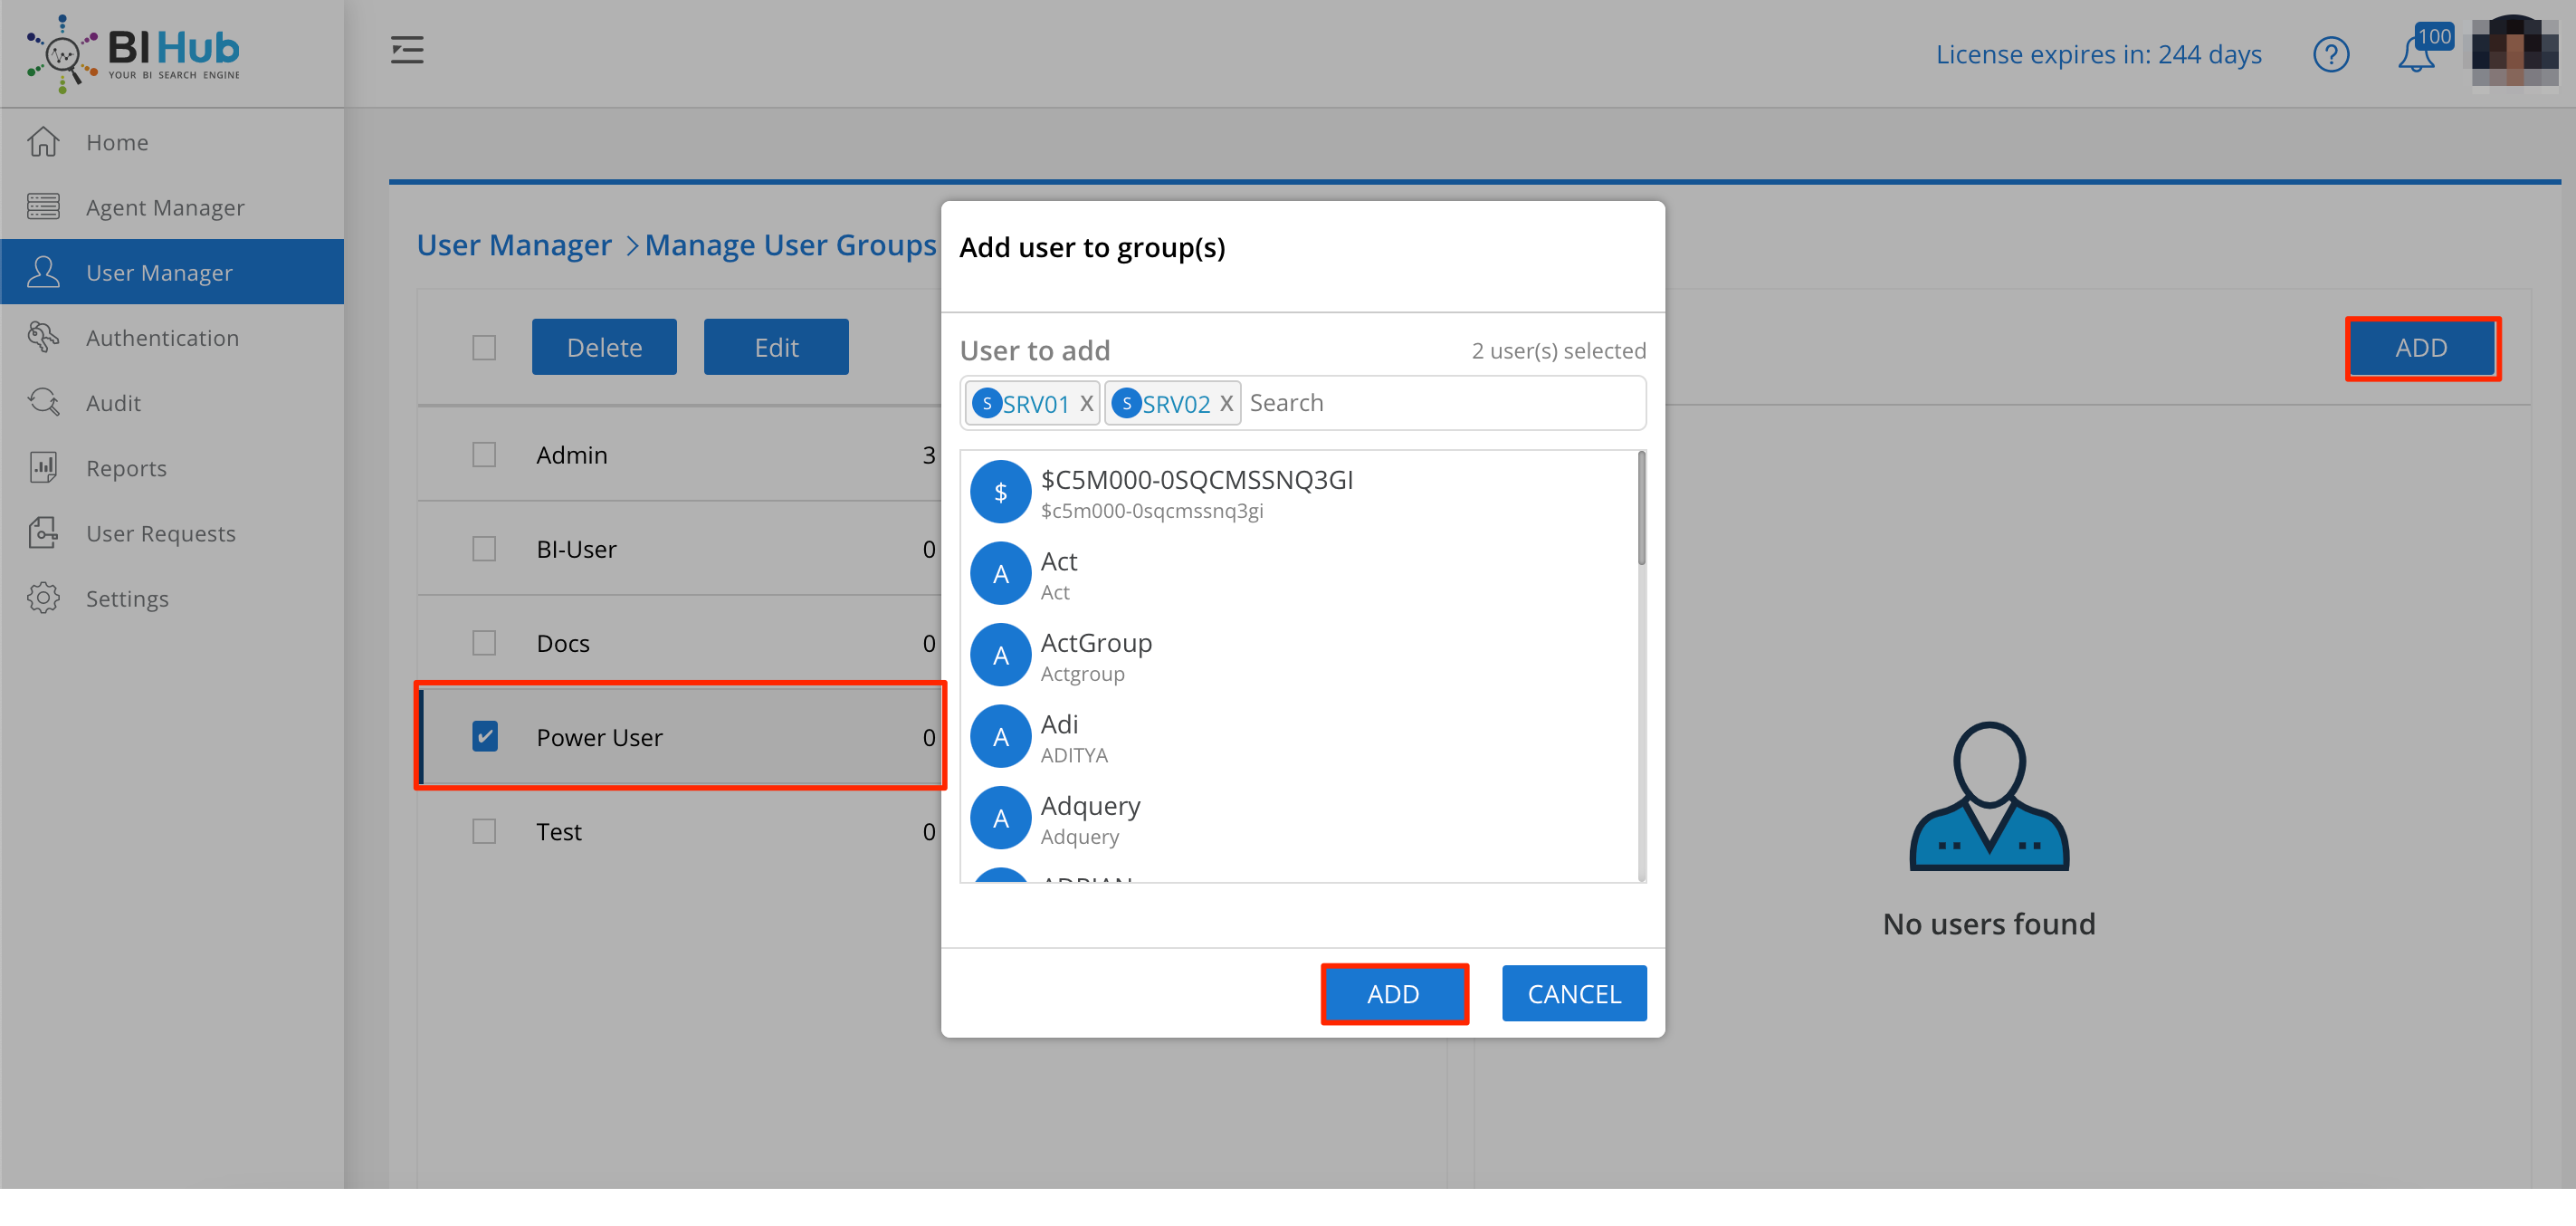
Select and add users to the Group
important
All the users(Power users) added to this user group will have both admin-mode and user-mode with the set of permissions enabled for a group.
Next Steps#
Log-in to Agilent platform as a Power user to administer the ABRT platform.